Create APIs using Golang | Part 3 : Connecting to a Database.

Introduction.
In a fully functioning app, a user can do actions on data. A user is also able to input his or her data into the system. To store and retrieve data, we need the help of a database.
What is a Database.
A database is a place where we store persistent data, meaning that the data will still exist even after the database application is stopped. The opposite of persistent data is non-persistent data, eg: in-memory cache, a topic that we’ll cover in the next article.
There are different paradigms of database and we select a paradigm based on our usecase. Fireship made an excellent video explaining the different kinds of database paradigms that you can check out below.
Since the library app we want to create is structured and transactional, we’ll use a Relational Database. According to Google, a relational database is a way of structuring information in tables, rows, and columns. A relational database can establish links (also known as relationships) between information by joining tables, which makes it easy to understand and gain insights into the relationships between various data points. To manage data inside of a relational database, SQL (Structured Query Language) is used.
Among the various options of relational databases available for free to use, we picked Postgres, a powerful and open-source object-relational database system that uses and extends the SQL language combined with many features that safely store and scale the most complicated data workloads.
Creating a Schema.
We can visualize a relational database as a series of tables that are connected via specific columns. The tables are domains of data, the columns are attributes of the domain, and the rows are instances of the domain.
Usually, the tables we need would correspond to the models that are defined in our application. But this rule might not always be the case. It goes back to the requirements of the application and whether or not we need to save the data generated in that specific domain.
Looking at the model defined in this application, Book, we can say that we need a books table, and the columns of the table will follow the attributes of the model. Different people have different conventions for naming tables. Personally, I use all small letters, snake case, and plural naming conventions, eg; borrowed_books.

Setting up a Migration.
After we know what the table will look like, now we need to create the table. We do this by creating a Migration. Migration is a concept of modifying a database using multiple separate SQL commands that are created only when we need to make changes to the database. These SQL commands are then run sequentially from the earliest to the latest (if you’re doing a fresh migration) or only the latest (if you’re running an existing migration). We need to implement a migration because database is a critical component of a backend system and we can’t modify it without proper tracking and documentation.
For creating the migration, we use a tool called migrate. This tool supports a wide array of databases and allows us to create and run our migrations directly from the command line. To create a migration, run the following command:
$ migrate create -ext sql -dir <migrations_destination_path>
# example
$ migrate create -ext sql -dir db/migration create_cakes_table
Notice that the migration tool has created two files in the /db/migration directory, a <timestamp>_create_books_table.up.sql and a <timestamp>_create_books_table.down.sql. The .up.sql file is used to add new changes to our database and the .down.sql is used to revert the changes we made. So essentially, one file should do the exact opposite of what the other is doing. This is done so that there will be no unreverted changes if we ever need to roll back our migrations.
    -- +migrate Up
    CREATE TABLE IF NOT EXISTS "books" (
        "id" BIGINT PRIMARY KEY,
        "title" TEXT NOT NULL,
        "author" TEXT NOT NULL DEFAULT '',
        "description" TEXT NOT NULL DEFAULT '',
        "published_date" DATE,
        "created_at" TIMESTAMP NOT NULL DEFAULT 'now()',
        "updated_at" TIMESTAMP NOT NULL DEFAULT 'now()',
        "deleted_at" TIMESTAMP
    );
    -- +migrate Down
    DROP TABLE IF EXISTS "books";
Now that we’ve created the SQL query to create our books table, we need to create the Golang script for automatic migration. Like I said before, migrate can be run using the command line, but since we’re already using a Makefile to create custom commands, might as well create a Golang script and add it to our Makefile to simplify the process.
❗ Disclaimer ❗
The entire database implementation is not included in this article because it would be too long. So if you’re following along with this article and run into missing codes, you can check out the Github repo.
    package main

    import (
        "flag"
        "os"

        migrate "github.com/golang-migrate/migrate/v4"
        "github.com/golang-migrate/migrate/v4/database/postgres"
        _ "github.com/golang-migrate/migrate/v4/source/file"
        "github.com/sirupsen/logrus"
        "github.com/ssentinull/create-apis-using-golang/internal/config"
        "github.com/ssentinull/create-apis-using-golang/internal/db"
        "github.com/ssentinull/create-apis-using-golang/internal/utils"
    )

    // initialize logger configurations
    func initLogger() {
        logLevel := logrus.ErrorLevel
        switch config.Env() {
        case "dev", "development":
            logLevel = logrus.InfoLevel
        }

        logrus.SetFormatter(&logrus.TextFormatter{
            ForceColors:     true,
            DisableSorting:  true,
            DisableColors:   false,
            FullTimestamp:   true,
            TimestampFormat: "15:04:05 02-01-2006",
        })

        logrus.SetOutput(os.Stdout)
        logrus.SetReportCaller(true)
        logrus.SetLevel(logLevel)
    }

    func init() {
        config.GetConf()
        initLogger()
    }

    func main() {
        direction := flag.String("direction", "up", "migration direction")
        step := flag.Int("step", 0, "migration step")

        flag.Parse()
        db.InitializePostgresConn()

        sqlDB, err := db.PostgresDB.DB()
        if err != nil {
            logrus.WithField("DatabaseDSN", config.DatabaseDSN()).Fatal("Failed to connect database: ", err)
        }

        driver, err := postgres.WithInstance(sqlDB, &postgres.Config{})
        if err != nil {
            logrus.WithField("sqlDB", utils.Dump(sqlDB)).Fatal("Failed to create driver: ", err)
        }

        migrations, err := migrate.NewWithDatabaseInstance("file://db/migration", "postgres", driver)
        if err != nil {
            logrus.WithField("driver", utils.Dump(driver)).Fatal("Failed to create migration instance: ", err)
        }

        migrations.Steps(*step)
        switch *direction {
        case "up":
            err = migrations.Up()
        case "down":
            err = migrations.Down()
        default:
            logrus.WithField("direction", *direction).Error("invalid direction: ", *direction)
            return
        }

        if err != nil {
            logrus.WithFields(logrus.Fields{
                "migrations": utils.Dump(migrations),
                "direction":  direction,
            }).Fatal("Failed to migrate database: ", err)
        }

        logrus.Infof("Applied migrations from step %d!\n", *step)
    }
    # command to run migration up
    migrate-up:
        go run internal/cmd/migration/main.go -direction=up -step=0

    # command to run migration down
    migrate-down:
        go run internal/cmd/migration/main.go -direction=down -step=0
$ make migrate-up
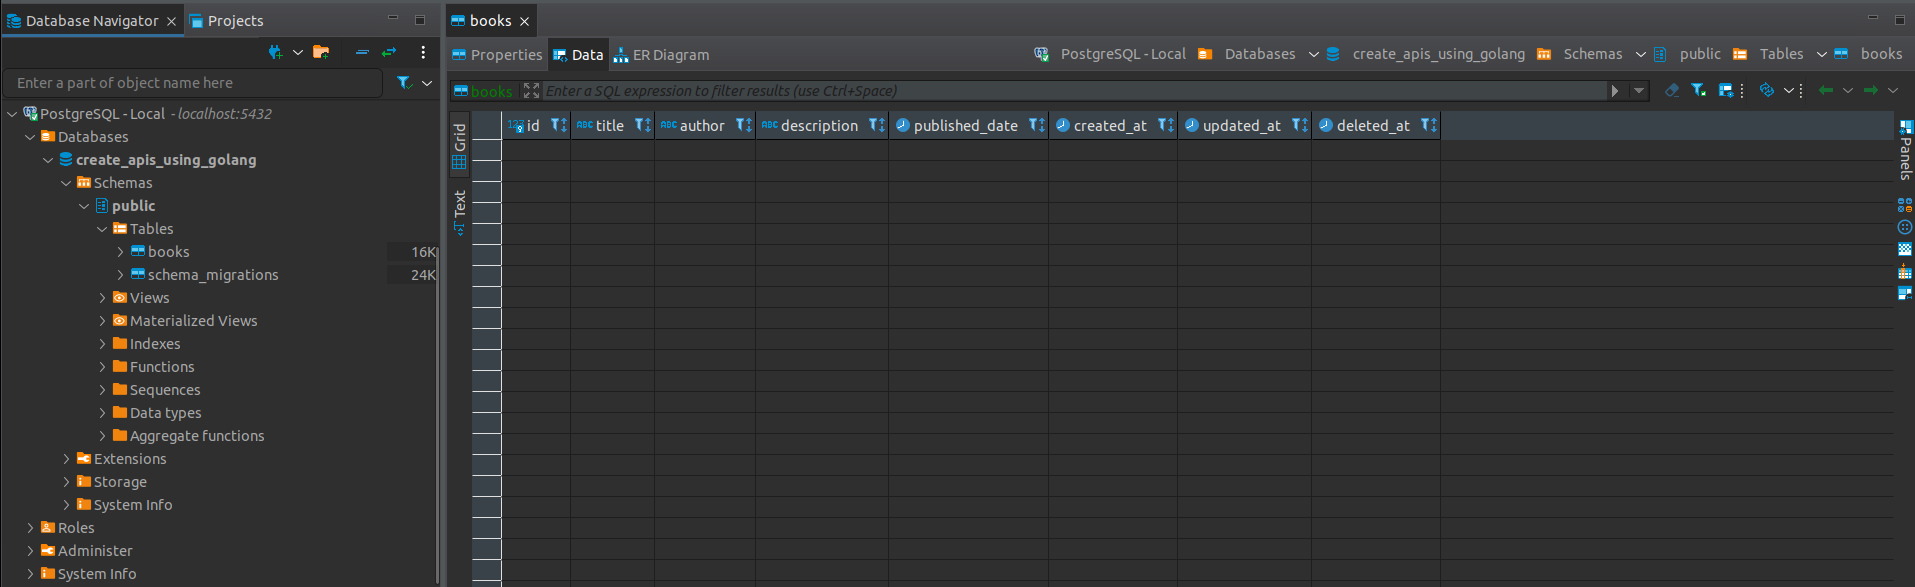
If we try running the migration command above and we check our database client (in this case I use DBeaver), we can see that our books table has been created.
Using an ORM.
ORM stands for Object Relational Mapping. It’s a technique used in creating a bridge between object-oriented programs and relational databases. An ORM composes SQL statements using programming paradigms and data structures native to that programming language and then executes those statements to the database it’s connected to. Some benefits of ORM are;
- It’s easier to create simple to moderately complex queries.
- It hides the complex processes under the hood and only lets you worry about the high-level implementation.
- It improves the security of the application because most ORM eliminates the possibility of a SQL injection attack.
But there are also drawbacks of using an ORM, such as;
- You might not fully understand the queries that are being composed by an ORM.
- An ORM might not be able to compose the most complex of queries.
- As the queries become more complex, you might run into performance issues.
Since our library app will not have complex queries, I think we should use an ORM. Our ORM of choice is Gorm. After installing Gorm, we can implement it in our repository layer.
    package postgres

    import (
        "context"

        "github.com/sirupsen/logrus"
        "github.com/ssentinull/create-apis-using-golang/internal/model"
        "github.com/ssentinull/create-apis-using-golang/internal/utils"
        "gorm.io/gorm"
    )

    type bookRepo struct {
        db *gorm.DB
    }

    func NewBookRepository(db *gorm.DB) model.BookRepository {
        return &bookRepo{db: db}
    }

    func (br *bookRepo) Create(ctx context.Context, book *model.Book) error {
        err := br.db.WithContext(ctx).Transaction(func(tx *gorm.DB) error {
            if err := tx.Create(book).Error; err != nil {
                return err

            }
            return nil
        })

        if err != nil {
            logrus.WithFields(logrus.Fields{
                "ctx":  utils.Dump(ctx),
                "book": utils.Dump(book),
            }).Error(err)
            return err
        }

        return nil
    }

    func (br *bookRepo) DeleteByID(ctx context.Context, ID int64) error {
        err := br.db.WithContext(ctx).Transaction(func(tx *gorm.DB) error {
            if err := tx.Delete(&model.Book{}, ID).Error; err != nil {
                return err
            }
            return nil
        })

        if err != nil {
            logrus.WithFields(logrus.Fields{
                "ctx": utils.Dump(ctx),
                "ID":  ID,
            }).Error(err)
            return err
        }

        return nil
    }

    func (br *bookRepo) FindByID(ctx context.Context, ID int64) (*model.Book, error) {
        book := &model.Book{}
        err := br.db.WithContext(ctx).Where("id = ?", ID).Take(&book).Error
        if err != nil {
            logrus.WithFields(logrus.Fields{
                "ctx": utils.Dump(ctx),
                "ID":  ID,
            }).Error(err)
            return nil, err
        }

        return book, nil
    }

    func (br *bookRepo) FindAll(ctx context.Context) ([]*model.Book, error) {
        books := []*model.Book{}
        err := br.db.WithContext(ctx).Order("id DESC").Find(&books).Error
        if err != nil {
            logrus.WithField("ctx", utils.Dump(ctx)).Error(err)
            return nil, err
        }

        return books, nil
    }

    func (br *bookRepo) Update(ctx context.Context, book *model.Book) (*model.Book, error) {
        err := br.db.WithContext(ctx).Transaction(func(tx *gorm.DB) error {
            if err := tx.Updates(book).Error; err != nil {
                return err
            }

            return nil
        })

        if err != nil {
            logrus.WithFields(logrus.Fields{
                "ctx":  utils.Dump(ctx),
                "book": utils.Dump(book),
            }).Error(err)
            return nil, err
        }

        return br.FindByID(ctx, book.ID)
    }
Let’s take a closer look at the modifications we’ve made, shall we.
    type bookRepo struct {
        db *gorm.DB
    }

    func NewBookRepository(db *gorm.DB) model.BookRepository {
        return &bookRepo{db: db}
    }
We created a db field of type *gorm.DB in the bookRepo struct. This is the Gorm object that is connected to our database that we’ll use to interact with our database. We also added a db *gorm.DB parameter to our NewBookRepository() constructor so that we can inject our *gorm.DB dependency.
    func (br *bookRepo) FindByID(ctx context.Context, ID int64) (*model.Book, error) {
        book := &model.Book{}
        err := br.db.WithContext(ctx).Where("id = ?", ID).Take(&book).Error
        if err != nil {
            logrus.WithFields(logrus.Fields{
                "ctx": utils.Dump(ctx),
                "ID":  ID,
            }).Error(err)
            return nil, err
        }

        return book, nil
    }
To interact with our database, we simply call the functions that we want to use on the db field that we previously added. In the example above, we want to find a book by its id, so we simply chain three different functions and a value:
WithContext(); change the current instancedb’s context toctx.Where(); append aWHERE <param> = ?clause to the SQL query based on the input parameters, in this case, the clause would beWHERE id = id.Take(); executes the query, returns the first row that satisfies theWHEREclause above, and assigns the returned value to thebookvariable.Error; returns the error value of the chained function.
Updating Our Server Implementation.
Now that we’ve added our database to our repository, it’s time to instantiate and inject it into our server.
    package main

    import (
        "net/http"
        "os"
        "time"

        "github.com/labstack/echo/v4"
        "github.com/sirupsen/logrus"
        "github.com/ssentinull/create-apis-using-golang/internal/config"
        "github.com/ssentinull/create-apis-using-golang/internal/db"
        _bookHTTPHndlr "github.com/ssentinull/create-apis-using-golang/internal/delivery/http"
        _bookRepo "github.com/ssentinull/create-apis-using-golang/internal/repository"
        _bookUcase "github.com/ssentinull/create-apis-using-golang/internal/usecase"
    )

    // initialize logger configurations
    func initLogger() {
        logLevel := logrus.ErrorLevel
        switch config.Env() {
        case "dev", "development":
            logLevel = logrus.InfoLevel
        }

        logrus.SetFormatter(&logrus.TextFormatter{
            ForceColors:     true,
            DisableSorting:  true,
            DisableColors:   false,
            FullTimestamp:   true,
            TimestampFormat: "15:04:05 02-01-2006",
        })

        logrus.SetOutput(os.Stdout)
        logrus.SetReportCaller(true)
        logrus.SetLevel(logLevel)
    }

    // run initLogger() before running main()
    func init() {
        config.GetConf()
        initLogger()
    }

    func main() {
        e := echo.New()

        db.InitializePostgresConn()
        bookRepo := _bookRepo.NewBookRepository(db.PostgresDB)
        bookUsecase := _bookUcase.NewBookUsecase(bookRepo)
        _bookHTTPHndlr.NewBookHTTPHandler(e, bookUsecase)

        s := &http.Server{
            Addr:         ":" + config.ServerPort(),
            ReadTimeout:  2 * time.Minute,
            WriteTimeout: 2 * time.Minute,
        }

        logrus.Fatal(e.StartServer(s))
    }
The modifications made are only the following:
    package main

    import (
        ...
        "github.com/ssentinull/create-apis-using-golang/internal/db"
        ...
    )

    ...

    func main() {
        ...
        db.InitializePostgresConn()
        bookRepo := _bookRepo.NewBookRepository(db.PostgresDB)
        ...
    }
We imported our Postgres database implementation from our db package, call the init function to initialize the connection and pass the database connection to our repository.
Testing the Application.
After we’ve done with all of that, it’s time to test our database implementation.
-
Create a new book.

We create a new Post request in Postman with a raw JSON body and include the following JSON object.
        {
            "title": "Harry Potter",
            "author": "J. K. Rowling",
            "description": "A book about wizardry and magic.",
            "published_date": "01-01-2021"
        }
After that, we click the send button and check our database client. We see that the book data has been inserted in the books table.

-
Read a book / books.
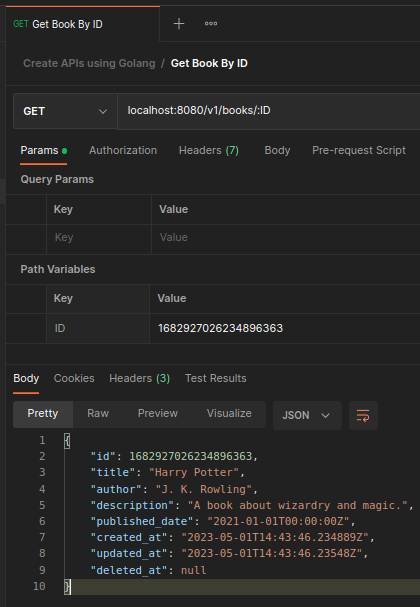
We create a Get request with an
:IDpath variable and we include theIDof the book that we just created. We see that our service fetched our recently created book with all of its data.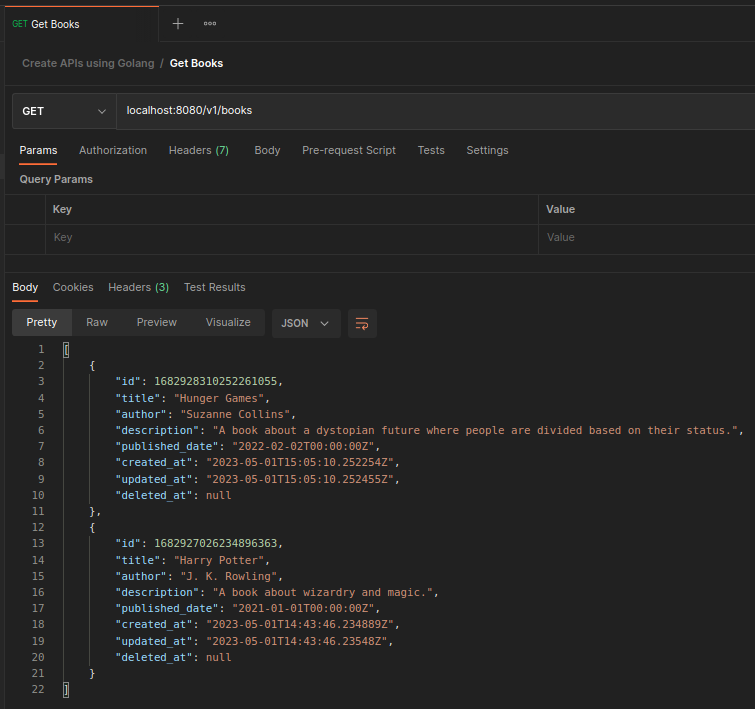
To demonstrate the fetching of multiple data, we create another book with different data. We then create a different Get request without an
:IDpath variable and click send. We see that our service returned the two books that we created. -
Update a book.
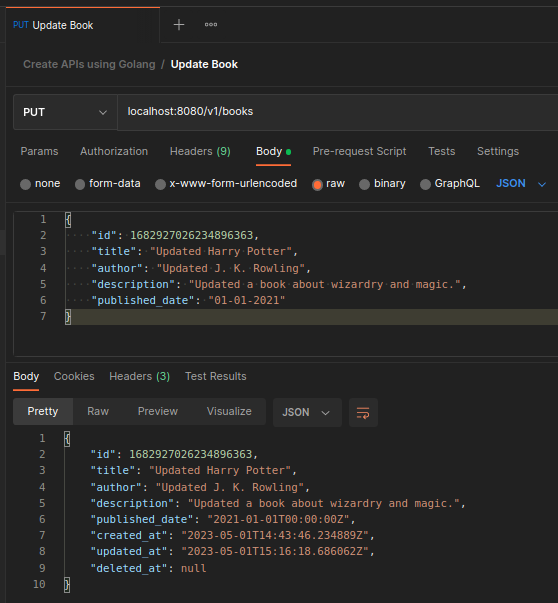
We create a Put request with a raw JSON body similar to when we create a book but we include the
IDof the book we want to update and it will return the updated book.{ "id": 1682927026234896363, "title": "Updated Harry Potter", "author": "Updated J. K. Rowling", "description": "Updated a book about wizardry and magic.", "published_date": "01-01-2021" } -
Delete a book.

We create a Delete request with an
:IDpath variable and we include theIDof the book we want to delete. After running the request our service will return aNo Contentresponse.
When we check our database client we see that the
deleted_atvalue of the book that we just deleted has been filled with the time when we deleted it.
And when we fetch all of the books, we see that only one book is listed.
Congrats!! 🥳 You’ve successfully connected a database to your application!! 👏 The next step would be to implement a caching mechanism for faster retrieval of data.
The Github repository for this step of this series can be found here.
I hope this could be beneficial to you. Thank you for taking the time to read this article. 🙏
– ssentinull